Celesta: SQL Database APIs, Schema Migration, and Testing in a Single Java Library
Just like the majority of open-source projects, Celesta emerged as an attempt to solve a practical problem when there were no other adequate tools available. In this case, it was a need to quickly create and deploy large amounts of small Java web applications that work with an RDBMS.
Sure, there are many frameworks and libraries out there to address the issue, but for us, using any of them resulted in expensive and slow development. Maintaining the database migration system and creating an automated testing and deployment system was labor-intensive. Existing approaches suitable for creating big applications turned to be unwieldy when facing a need to mass-produce relatively small services using Spring Boot. We also needed to reuse the code written for different projects, including for different types of RDBMS.
And Celesta, a free open-source library, was created to simplify this task and help us focus on business logic.
In short, Celesta is:
-
An intermediary layer between the relational database and the business logic code implementing a database-first approach to design.
-
A means to migrate the database structure.
-
A framework for testing the data-operating code.
Celesta supports the following types of relational databases: PostgreSQL, MS SQL Server, Oracle, Firebird (beta) and H2.
Key Celesta capabilities:
-
The idea is very similar to the main Java principle: “Write once, run on every supported RDBMS.” The business logic code does not know what type of database it is executed on. You can write business logic code and run it in MS SQL Server, then switch to PostgreSQL, and the transition will be smooth. Well, almost :).
-
Automatic migration of a live database. Most of the Celesta project lifecycle takes place when the database already exists and is being filled with data to persist, and, at the same time, the schema needs to be constantly changing. Celesta is able to automatically adjust the database structure to fit your data schema.
-
Testing. You can automatically test methods, changing the data in the database and do it easily, fast and gently, without resorting to external tools like DbUnit and containers.
Why Do You Need Database Type Independent Code?
It is not a coincidence that we first mentioned the business logic code independence from RDBMS type — Celesta code does not know what RDBMS it is executed on. Why would it?
First of all, RDMBS choice is often a matter of preference. Our clients often have their preferred RDMBS they invested in, and they want to have solutions developed for the existing infrastructure. Technological landscape shifts: today, PostgreSQL is becoming more frequent, while just a few years ago we saw the dominance of MS SQL Server. Celesta supports the most widely used RDBMS, and these changes do not concern us.
Secondly, we wanted to reuse the code from project to project and create a reusable library. Things like hierarchical directories and email notification delivery modules are essentially standard, so why support several versions for clients with different RDMBS?
And last but not the least, it allows users to launch unit tests without tools like DbUnit and containers using an H2 embedded database. An H2 database does not require installation and starts up instantly in an in-memory mode. Celesta quickly creates a data scheme in it to run the tests and “forget” the database afterward.
With database type independence, it really does not matter on what database the business logic is executed, so if no errors occur in H2, the same will be true for PostgreSQL as well. Of course, the Celesta development team needs to run multiple tests on a real RDBMS to make sure the platform executes its API uniformly on different RDMBS. And we do this, so the business logic developers are spared the task.
CelestaSQL
How is this cross-database functionality achieved? Naturally, the price for that is a need for a special API to isolate the business logic from any database-related aspects to work with the data. Celesta generates the code of data access Java classes, and for the database, it generates SQL code and certain auxiliary objects.
Celesta does not allow for object-relational mapping as is, because the data model design is based on the database structure and not on classes. I.e. first, an ER model for tables is designed, and then Celesta generates data access classes (cursors) in accordance with it.
It is possible to achieve the same behavior of the code running with all the supported RDBMS only for the features implemented more or less similarly in each of them. If we use the Euler diagram to represent the sets of features of supported databases, we get the following result:

If we ensure full independence from the database type, the functional capabilities for Celesta users must lie in the intersection of all the feature sets. And at first glance, this seems to be a major limitation. Certainly, some specific features of, say, MS SQL Server, are inaccessible for us. But, all relational databases support tables, foreign keys, views, sequences, and SQL queries with JOIN and GROUP BY statements. These are the tools we can provide to developers. We offer a "generalized SQL" that is transpiled to SQL queries for respective database dialects and call it CelestaSQL.
CelestaSQL language includes DDL to define database objects and SELECT queries for views and filters, but it does not contain DML commands — modification is done by cursors, and we will cover those later.
Every database has its own data typeset. And CelestaSQL language also has its own. At the time, this article is being written, there are nine of them, and in this table, they are compared to types from different databases and Java data types.
Nine types might seem to be few (compared to the number PostgreSQL supports, for example), but in reality, they are enough to store financial, trading, and logistic information: strings, integers and floating-point values, dates, Boolean values, and BLOBs are always enough to represent that kind of data.
The CelestaSQL language is described in the documentation featuring an abundance of syntax diagrams.
Database Structure Modification: Idempotent DDL
Another key functional capability of Celesta is the approach to production database structure migration as the project develops. This feature is implemented with a built-in approach utilizing an idempotent DDL.
In short, when we write the following text in CelestaSQL:
 CREATE TABLE OrderLine(
  order_id VARCHAR(30) NOT NULL,
  line_no INT NOT NULL,
  item_id VARCHAR(30) NOT NULL,
  item_name VARCHAR(100),
  qty INT NOT NULL DEFAULT 0,
  cost REAL NOT NULL DEFAULT 0.0,
  CONSTRAINT Idx_OrderLine PRIMARY KEY (order_id, line_no)
);
Celesta interprets it not as, “create a table, and if it already exists, return an error”, but as “modify the table to match the required structure”. In other words: “If the table does not exist, create it, and if it does, look at its fields, their types, indices, foreign keys, default values, etc. and alter them in case there is a need to modify anything to match the required structure.”
This approach allows refactoring and version control of a database schema with database structure definition scripts:
-
We always see the current required structure model (unlike tools like Liquibase).
-
The version control system allows users to see what has changed in the structure over time, who has made the changes, and why.
-
And when it comes to the
ALTERcommands, Celesta produces and executes them if necessary under the hood.
Certainly, this approach has its limitations. Celesta makes great efforts to perform automatic migration painlessly and unnoticeably, but sometimes it is impossible. We have explained the rationale, capabilities, and limitations of this approach in this article.
Celesta saves DDL scripts’ checksums to speed up database structure verification/update (database structure verification and update start only when the checksum changes). Problems related to the order in which the interdependent objects change are eliminated due to the topological sorting of dependencies between schemas and foreign keys. Automatic migration is described in detail in the documentation.
Can the database migration mechanism use an idempotent DDL be utilized separately from Celesta? Yes, 2bass, a tool that uses Celesta internally, makes it possible.
Creating a Celesta Project and a Data Model
The demo project we are going to talk about is available on GitHub. Let us talk about how to use Celesta when writing a Spring Boot application. We will need the following Maven dependencies:
-
org.springframework.boot:spring-boot-starter-webandru.curs:spring-boot-starter-celesta(see the documentation for more detail). -
You should use
ru.curs:celesta-system-servicesif you do not use Spring Boot starter. -
For data access class code generation,
ru.curs:celesta-maven-pluginis required. See the demo source files and the documentation for configuration details. -
To enable writing Junit5 unit tests for data modification methods, add ru.curs:celesta-unit to the test scope.
Now, let us create a data model and generate data access classes.
Assume this is a project for an e-commerce company recently merged with another company. And each of them has their own databases. They receive purchase orders, but until they join their databases, they need a single entry point to receive orders from outside.
It is possible to implement the entry point in a traditional fashion: an HTTP service with CRUD operations saving data to a relational database.
A database-first approach is implemented in Celesta, so first, we need to create a structure of the tables. Order, as we all know, is a composite entity: it consists of a single header — containing information about the client, order date, and other attributes — and multiple lines (items).
So let us get started, create:
-
An
src/main/celestasqlfolder — by default, this is a path to CelestaSQL scripts of the project. -
Subfolder matching the structure of java package folders (in this case,
ru/inponomarev/celestademo). -
A
.sqlfile in the package folder with the following content:
CREATE SCHEMA demo VERSION '1.0';

/**Order header*/
CREATE TABLE OrderHeader(
  id VARCHAR(30) NOT NULL,
  date DATETIME,
  customer_id VARCHAR(30),
  /**Customer name*/
  customer_name VARCHAR(50),
  manager_id VARCHAR(30),
  CONSTRAINT Pk_OrderHeader PRIMARY KEY (id)
);

/**Order line*/
CREATE TABLE OrderLine(
  order_id VARCHAR(30) NOT NULL,
  line_no INT NOT NULL,
  item_id VARCHAR(30) NOT NULL,
  item_name VARCHAR(100),
  qty INT NOT NULL DEFAULT 0,
  cost REAL NOT NULL DEFAULT 0.0,
  CONSTRAINT Idx_OrderLine PRIMARY KEY (order_id, line_no)
);

ALTER TABLE OrderLine ADD CONSTRAINT fk_OrderLine FOREIGN KEY (order_id) REFERENCES OrderHeader(id);

CREATE VIEW OrderedQty AS
  SELECT item_id, sum(qty) AS qty FROM OrderLine GROUP BY item_id;
We have defined two tables connected with a foreign key and a view to return the total quantity of products in all orders. As you may see, this is not dissimilar to standard SQL at all. Still, there are some specific aspects. For example, all table and field names we use must be convertible into Java class and variable names. So we cannot use spaces and hyphens. You could have also noted that some of the comments we added above the names of some tables and fields start not with usual /* , but with /** , as JavaDoc comments, and there is a reason for that! The comment for an object starting with /** is available in the run time in its .getCelestaDoc() property. It can help when we want to add extra meta-information for database elements: i.e. human-readable field names, information about field representation in the user interface and so on.
The CelestaSQL script serves two equally important purposes: to deploy/modify the relational database structure and to generate data access class code.
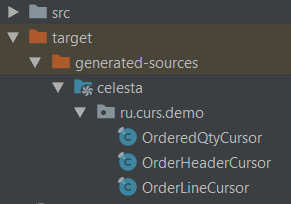
Now we can generate data access classes by simply executing a mvn generate-sources command, and if you are working in IDEA, by pressing the ‘Generate sources and update folders’ button on the Maven control panel. In any case, IDEA will recognize the folder created in target/generated-sources/celesta as a generated source folder. The generated code will look as follows, one class for each object in the database:
Connection to the database is set in the application settings, in our case, in the src/main/resources/application.yml file. If using spring-boot-starter-celesta, the IDEA code completion will suggest available options.
If we do not want to fiddle with running a “real” RDBMS just for a demo, we can make Celesta work with a built-in H2 database in an in-memory mode by setting the following configuration:
celesta:
  h2:
    inMemory: true
To connect a “real” database, change it to something like this:
celesta:
  jdbc:
    url: jdbc:postgresql://127.0.0.1:5432/celesta
    username: <your_username>
    password: <your_password>
(in this case, you also need to add a PostgreSQL JDBC driver to your application via a Maven dependency).
When launching Celesta application connected to the database server, you can see that the necessary tables, views, indices, etc. are created for an empty database and upgraded for a non-empty one to match the definition given in Celesta SQL DDL scripts.
Creating Methods Working with Data
After getting your head around the database structure, you can start writing the business logic.
To implement permission management and data change logging, every operation with data in Celesta is performed on behalf of some user – anonymous operations are impossible. So all Celesta code is executed in a call context described in the CallContext class.
-
CallContextactivates before starting operations able to change data in the database. -
At the moment of activation, a connection to the database is taken from the pool and the transaction starts.
-
After finishing the operation,
commit()is executed for theCallContextif the operation is successful, orrollback()if an uncaught exception occurs during the operation. -
Finally,
CallContextcloses, and the connection to the database returns to the pool.
If we use spring-boot-starter-celesta, these actions are performed automatically for all methods annotated by @CelestaTransaction.
For example, we want to write a request handler saving a document to the database. At the controller level, its code may look as follows:
@RestController
@RequestMapping("/api")
public class DocumentController {
  private final DocumentService srv;
  public DocumentController(DocumentService srv) {
    this.srv = srv;
  }
  @PutMapping("/save")
  public void saveOrder(@RequestBody OrderDto order) {
    CallContext ctx = new CallContext("user1"); //new SystemCallContext();
    srv.postOrder(ctx, order);
  }
}
Usually, at the controller method level (i.e. after authentication), we know the user’s ID and can use it when creating CallContext. Binding the user to the context determines access rights to tables and allows to log changes made on their behalf. If you do not want to use the Celesta permission management system and give the call context full rights to all tables, you can create a SystemCallContext object instead.
The order saving method at the service level may look as follows:
@Service
public class DocumentService {

    @CelestaTransaction
    public void postOrder(CallContext context, OrderDto doc) {
        try (OrderHeaderCursor header = new OrderHeaderCursor(context);
             OrderLineCursor line = new OrderLineCursor(context)) {
            header.setId(doc.getId());
            header.setDate(
              Date.from(doc.getDate().atStartOfDay(
              ZoneId.systemDefault()).toInstant()));
            header.setCustomer_id(doc.getCustomerId());
            header.setCustomer_name(doc.getCustomerName());
            header.insert();
            int lineNo = 0;

            for (OrderLineDto docLine : doc.getLines()) {
                lineNo++;
                line.setLine_no(lineNo);
                line.setOrder_id(doc.getId());
                line.setItem_id(docLine.getItemId());
                line.setQty(docLine.getQty());
                line.insert();
            }
        }

    }
Note the @CelestaTransaction annotation. It allows the DocumentService proxy object to perform all service actions with the CallContext ctx parameter described above. So, at the start of the method execution, it is already bound to the database connection, and the transaction is ready to start. Meanwhile, we can focus on writing business logic (in this case, reading the OrderDto object and saving it to the database).
To do that, we use the so-called cursors, which are classes generated, using celesta-maven-plugin. We have already seen what they look like. For each schema object — in this case, two tables and one view — a class is generated. And now, we can use these classes to access database objects in our business logic.
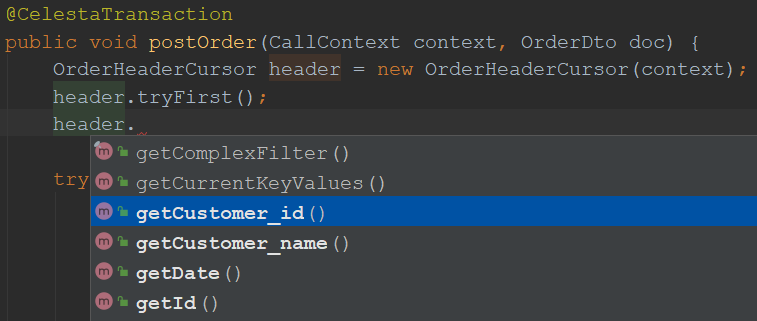
You need the following code to create a cursor for an order table and select the first record:
OrderHeaderCursor header = new OrderHeaderCursor(context);
header.tryFirst();
After creating a header object, we can access the table record fields using getters and setters:
When creating an active cursor, we have to use an active call context — this is the only way to create one. Call context stores information on the current user and their access rights.
We can do a lot with a cursor object: filter, navigate, insert, delete, and modify records. See the documentation for the detailed cursor API description.
For example, we can develop our demo code this way:
OrderHeaderCursor header = new OrderHeaderCursor(context);
header.setRange("manager_id", "manager1");
header.tryFirst();
header.setCounter(header.getCounter() + 1);
header.update();
Here, we set a filter for the manager_id field and then find the first record with a tryFirst method.
The moment tryFirst executes, cursor fields are filled with data of a single record and we can read and assign them. And when the data in the cursor is fully prepared, execute update() to save the cursor content to the database.
What problems can this code encounter? Certainly, it can encounter a race condition/lost update! This may happen because somebody else can access, modify, or update data in the database in the gap between the moment we get the data using tryFirst and the moment we try to update the data at the update stage.
After the data is read, the cursor does not prevent other users from using it in any way! To prevent lost updates, Celesta uses an optimistic lock. By default, it creates a recversion field in each table, increments the version number in an ON UPDATE trigger, verifies that the updated data has the same version as that in the table, and throws an exception if the mismatch occurs. For more detail, see the Lost Updates Prevention section in the documentation.
Again, the transaction is bound to a CallContext object. If the Celesta procedure ends successfully, it commits the changes, and it rolls back if the method ends with an uncaught exception. So, if an error occurs in a complex procedure, the whole transaction associated with the call context rolls back — everything stays just as it was before the start, and the data is not corrupted. If you need to commit in the middle for some reason — for some long time executing procedure, for example — you can do so by committing explicitly by calling context.commit().
Cursors allow you to write code that works with the database efficiently. See the Best Practices section in the Celesta documentation to learn how to do it properly and avoid unnecessary load on the database.
Testing Methods Working With Data
Let us create a unit test to check the correct operation of the service method used to save OrderDto to the database.
It is easy to do by using JUnit5 and an extension for it in the celesta-unit module. The test structure is the following:
@CelestaTest
public class DocumentServiceTest {
    DocumentService srv = new DocumentService();

    @Test
    void documentIsPutToDb(CallContext context) {
        OrderDto doc =...
        srv.postOrder(context, doc);
        //Check the fact that records are in the database
        OrderHeaderCursor header = new OrderHeaderCursor(context);
        header.tryFirst();
        assertEquals(doc.getId(), header.getId());
        OrderLineCursor line = new OrderLineCursor(context);
        line.setRange("order_id", doc.getId());
        assertEquals(2, line.count());
    }
}
The @CelestaTest annotation allows us to declare the CallContext context parameter in testing methods. This context is already activated and is bound to the database (in-memory H2), so we do not need to use a proxy for the service class. We create it with new here and not using Spring. At the same time, there are no obstacles for using Spring testing facilities instead.
We create unit tests, assuming that the database at the time of their execution is completely empty but has a structure we need. After their execution, we do not need to worry about cleaning up the database. These tests are very fast.
Let us create a second procedure to return JSON with aggregated values, showing the quantity of ordered products.
The test adds two orders to the database and then checks the aggregated value returned with a new getAggregateReport method:
@Test
void reportReturnsAggregatedQuantities(CallContext context) {
    srv.postOrder(context, . . .);
    srv.postOrder(context, . . .);
    Map<String, Integer> result = srv.getAggregateReport(context);
    assertEquals(5, result.get("A").intValue());
    assertEquals(7, result.get("B").intValue());
}
To implement the getAggregateReport method, we use the OrderedQty view, which reads as follows in a CelestaSQL file:
create view OrderedQty as
     select item_id, sum(qty) as qty from OrderLine group by item_id;
The query is standard: we add the order lines by quantity and group by product code. To access its data, we can use the generated OrderedQtyCursor class. We declare the cursor, iterate it and collect the Map<String, Integer>, as follows:
@CelestaTransaction
public Map<String, Integer> getAggregateReport(CallContext context) {
    Map<String, Integer> result = new HashMap<>();
    try (OrderedQtyCursor ordered_qty = new OrderedQtyCursor(context)) {
        for (OrderedQtyCursor line : ordered_qty) {
            result.put(ordered_qty.getItem_id(), ordered_qty.getQty());
        }
    }
    return result;
}
Materialized Celesta Views
What is wrong with using views to get aggregated data? This method is actionable, but it is a disaster waiting to happen because a SQL query is executed more and more slowly as the system accumulates data. It has to add up and group increasing amounts of table rows. How do you avoid it?
MS SQL Server has a concept of materialized (indexed) views stored as tables and quickly updated as the data changes in the source tables. If we were working in ‘vanilla’ MS SQL Server, replacing views with indexed views would be just the thing we need: extracting an aggregated report would not slow down as the data accumulates, and the report would be updated the moment the order items enter the table, which also would stay at about the same speed as the number of rows grows.
But, what are our options with PostgreSQL in Celesta? Redefine the view by adding the word "materialized":
 create materialized view OrderedQty as
     select item_id, sum(qty) as qty from OrderLine group by item_id;
Launch the system and see what has happened to the database.
Note that the OrderedQty view has vanished and has been replaced with an OrderedQty table. And as the OrderLine tables is filled with data, and the information in the OrderedQty table "magically" updates the same way views update.
There is no magic here: look at the triggers defined for the OrderLine table. Having received a task to create a materialized view, Celesta analyzed the query and created triggers in the OrderLine table to update OrderedQty. By adding a single keyword — materialized — to the CelestaSQL file, we have solved the problem of declining performance without making a single change to the business logic!
Naturally, this approach has rather strict limitations. In Celesta, you can only materialize the views built on a single table, with no JOIN s or aggregation by GROUP BY. But, this is enough to prepare account and inventory statements and similar common reports.
Conclusion
We have briefly explained the key Celesta capabilities. You’re welcome to check out GitHub and the documentation if you are interested in the technology.